
Build A Website Basics
Author: Dakota Roth
form to fill out
by the end of this tutorial you will be able to:
- use basic HTML
- use CSS to style your website
- understand the basics of how version control works
- publish your website to the web!
If you don't have one already, now is a good time to make a github account. (github.com)
Outline:
- Copying the Template
- Setting up the online IDE
- Exploring the IDE
- Editing your website
- Styling your website
- Using Git to commit our changes
- Publish your site
Legal Disclaimer (for miners):
Github doesn't say 13-18 year olds can’t make accounts, but it is technically a legal contract like most accounts. they just assume your parents are liable for you incase of you doing something dumb. :)
Copying The Template
- Let's start by cloning the template from the github, you can get the template from here
- Click on “Use this template”, then select “create a new repository”. This will make a copy of the repository for yourself,
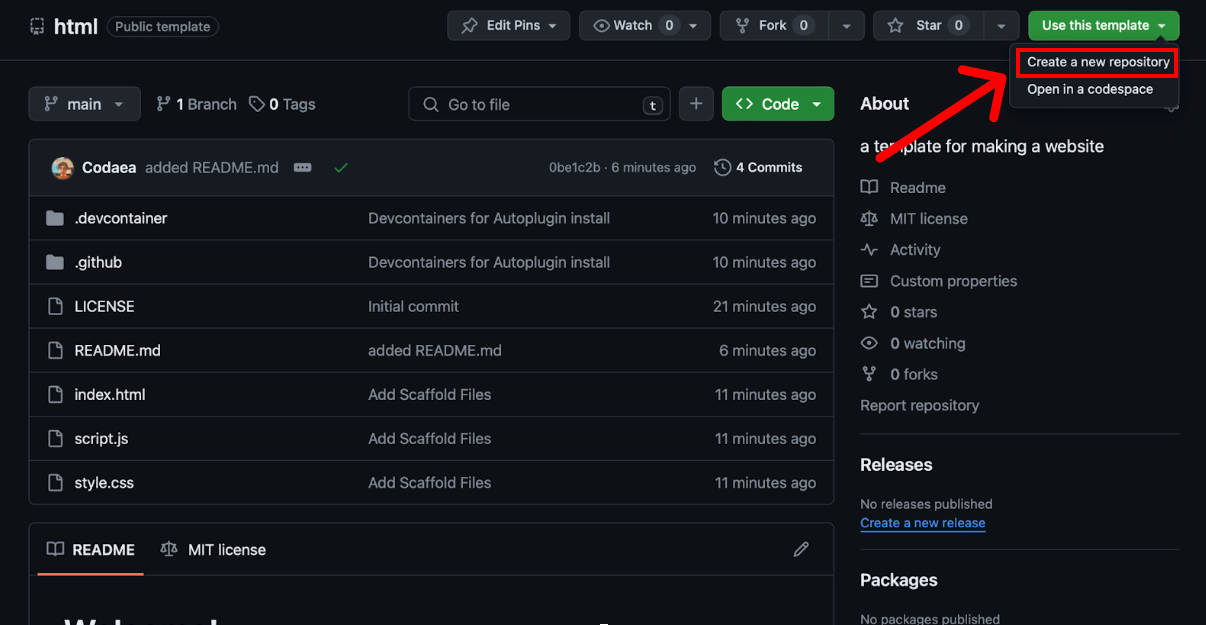
TODO: make arrow
- Choose a name (your website will end up being at
YourUsername.github.io/RepositoryNameso choose wisely.) and make sure to leave the visibility of the repo (repository) to public ( otherwise you can’t publish your website )
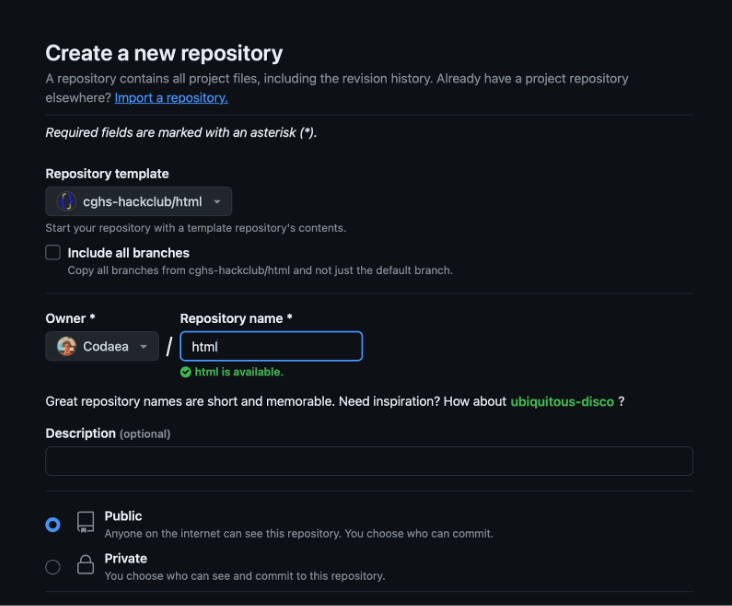
- After pressing
Create Repository, you get redirected to your copy of the repo!
Setting Up The Online IDE
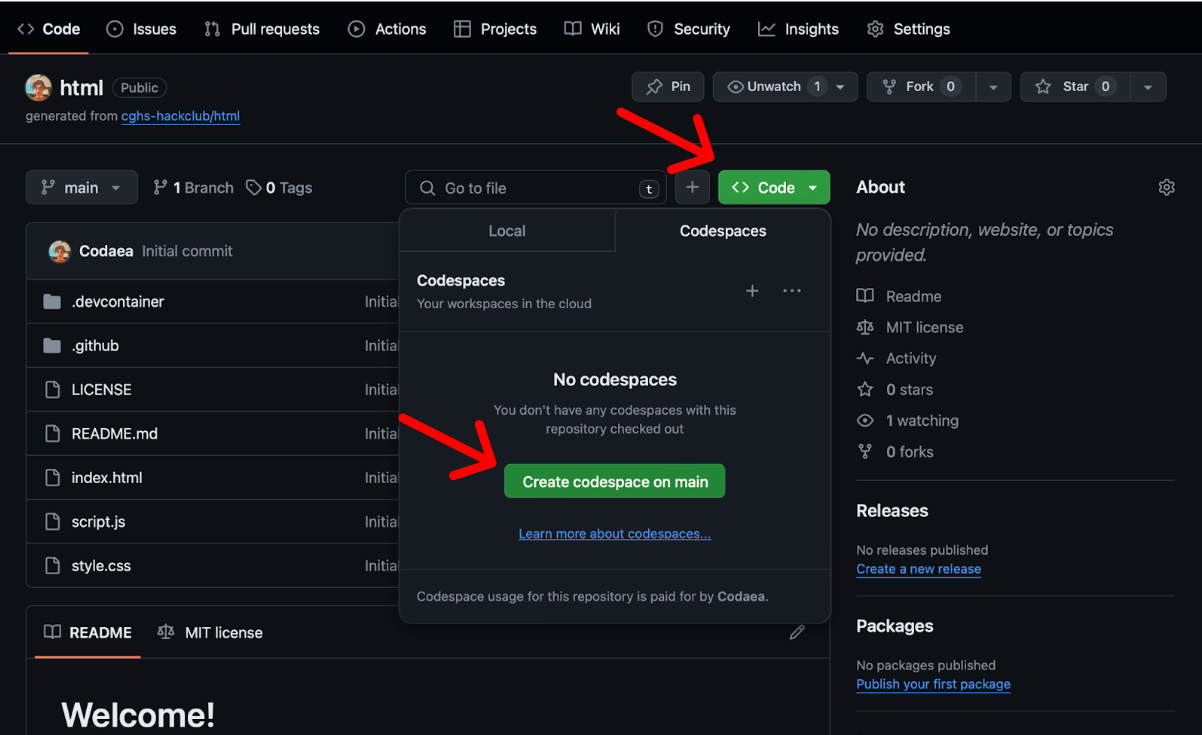
From the green code button, select the “Codespaces” tab, and click on the plus icon. This makes an IDE in a new tab, and this is where we will edit and preview our website.
Touring the IDE:
- You should see a screen like this
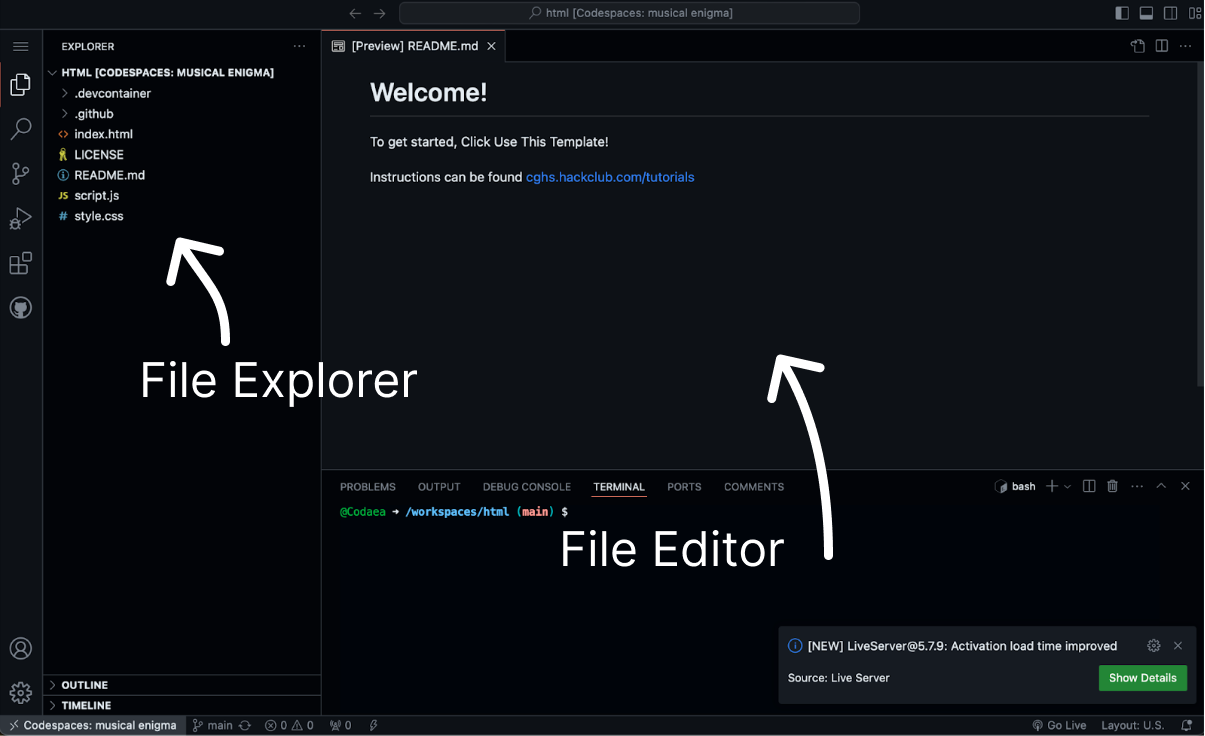
TODO: add graphic arrows and text over
- On the left, you have your file explorer. This is where you will select files to edit.
- In the middle is the file editor, where you will edit the code of your website!
- Using the file explorer, you can see the files that are already there.
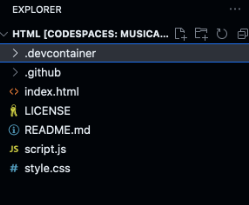
#DROPDOWN What each file is
.devcontainer and “.github” are both folders for some setup for the template, you can ignore these.
Index.html is your main website page, and is the first page your website will show.
LICENSE is just a file that is automatically created, and dictates how others can use your code. By default, this is a MIT license. You can delete this if you want to copyright your code. If you are interested, you can learn more about the MIT Licence here
README.md is a markdown (fancy .txt file) that is usually used as the start for documentation. Most projects use this as a how to get started/quickstart for their project. ((This tutorial is also a markdown file!)www.example.com)
script.js is the script that the index.html file references for using scripts. We can just ignore this for now.
“Style.css” is the styling file for our index.html. Think of css (cascading styling sheets) as sort of the design of making our website look cool, and the .html as the content we are styling.
Making Your Website
- To get started, let's click on the
index.html.
<!DOCTYPE html>
<html>

<head>
  <meta charset="utf-8">
  <meta name="viewport" content="width=device-width">
  <title>replit</title>
  <link href="style.css" rel="stylesheet" type="text/css" />
</head>

<body>
  Hello world
  <script src="script.js"></script>
</body>

</html>
html is a language that makes up all websites. In fact, it makes up this website right now! If you right click and press inspect (or press Control+Shift+C on chrome) you can see the code that makes up this website.
This is where the bulk of our website will be made.
Html works by storing information inside of tags. A tag is a open arrow with a word and then a closing arrow. Tags usually go together, with one defining the start, <a> and another defining the end </a>.
TODO: Dropdown here MDC >> What do all these other tags I see do?
!DOCTYLE htmlis just used so the computer knows what kind of file it is.htmlspecifies the start of our website. Everything inside of here will be on the website when we visit it.
The <head> tag is for sending hidden data to your browser, something that you don't see on the website, but is somewhere else.
The <link> is how we connect the other style.css file we had from earlier. The only other interesting tag in here is the <title> tag. The text inside the tag is what names the tab in your browser at the top
The <body> is where we will spend the majority of the time coding,
That's cool and all, but how do I see what my code looks like when I'm running it?
To start the preview, click “Go Live” in the bottom right corner.
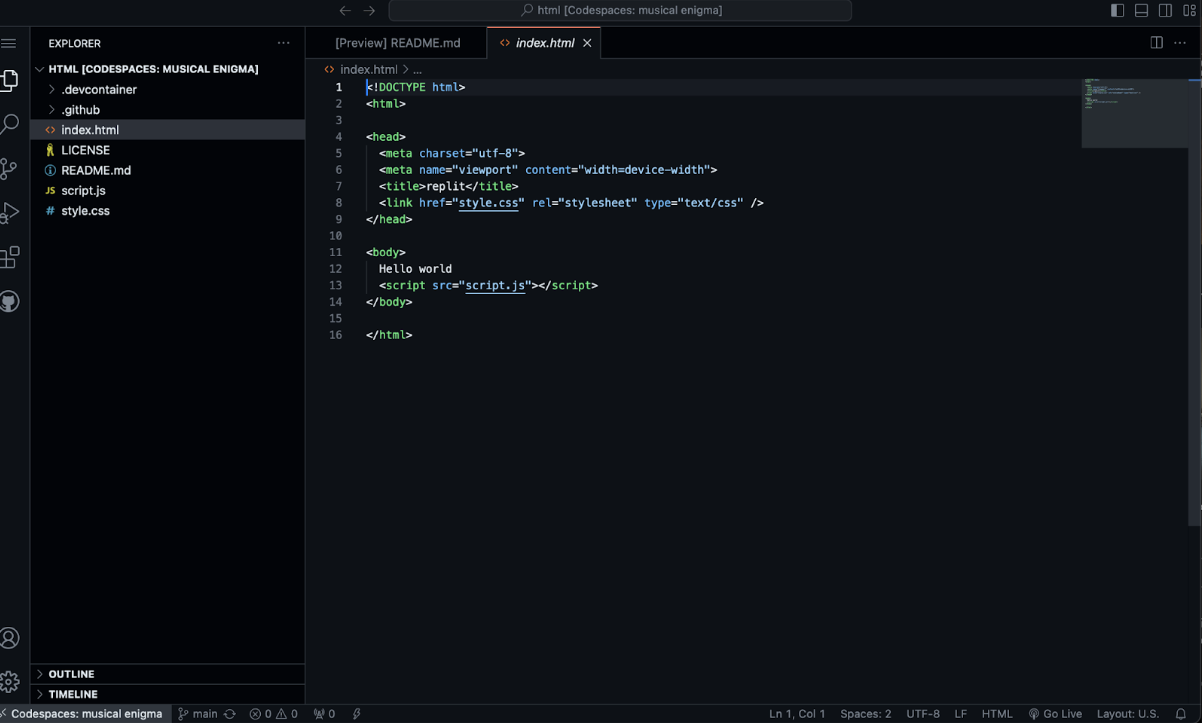 TODO: arrow to go live
You may get a pop up along the lines of the browser interrupted opening of a new tab. Press open, and you should get a new tab containing the preview of your website!
In the <body> tags of your file, you should see hello world!. If you change any of it and go back to your website, it will update on your site!
But I want more interesting things on my website than just text!
Normally, text in the <body> will go inside of other tags, such as <p></p> for paragraphs and etc.
Writing text not inside of tag’s is frowned upon, as it is just there as a backup if your website is broken.
There are all sorts of tags you can use, here are just a few
<h1><h1/>This will make a heading in size 1<p><p/>will make a paragraph,<br>will insert a blank line. (notice how some tags don't have a closing one!)<strong><strong/>will make your text Bold
<h1>This is a heading!</h1>
<p>this is a content paragraph. notice how anything below it starts on a new line</p>
<strong>big and bulky text!</strong>
<p>something before br</p>
<br>
<br>
<br>
<p>something after br</p>
You can see a full list of all tags here at w3 schools. Some of these old and are no longer used in modern html, so not all will work.
Ok, now I have types of text and lists. But I want IMAGES!!!
Cool! Images are like text, except they have attributes to define where the image comes from. Let's start with finding an image we want on google to be on our website.
When you find the one, right click on it and select Copy Image Address if you paste this into an address bar, you will see just the image!
Images are done in the tag <img/>, and also have a attribute called src. An example of what one might look like is below
<img src="www.example.com/cats.png"/>
The attribute for image location is called src, and is used to specify a URL that directs to a image.
There are a few other ones that REQUIRE attributes to work, such as
<a href="www.example.com">click me!</a>
#TODO : make the last two code blocks preview and code
<a></a> will make a link that you can click on. notice how this also has attributes.
Adding Style To our Text
Remember attributes from earlier? One of them is called style. This can be used on any element, and allow you to customize the way they look. For example,
<h1 style="color:blue;text-decoration: underline;" > Hello There, I am Blue! (and underlined)</h1>
Notice how each thing inside of style goes property:value;. These are css properties.

color:FFFFFF;change text color in hex databackground-color:FFFFFF;changes the background color (also in hex)
You can find all the css properties here.
I want to color lots of things together!
Great! That's where style.css from earlier comes in.
DROPDOWN >> How does it link?
In the head, you will see a <link href="style.css" rel="stylesheet" type="text/css" />.
This tells the browser to look for the file style.css (href) and then the relationship (rel) and then the type.
If we select style.css from the explorer, we get a new file to work on. This one doesn't look like the .html, and has a different format.
A css file might look something like this.
/* Applies to the entire body of the HTML document (except where overridden by more specific
selectors). */
body {
  margin: 25px;
  background-color: rgb(240,240,240);
  font-family: arial, sans-serif;
  font-size: 14px;
}

/* Applies to all <h1>...</h1> elements. */
h1 {
  font-size: 35px;
  font-weight: normal;
  margin-top: 5px;
}

/* Applies to all elements with <... class="someclass"> specified. */
.someclass { color: red; }

/* Applies to the element with <... id="someid"> specified. */
#someid { color: green; }
Each CSS "rule" consists of a selector and a declaration.

A selector selects what things we want to style. For example, h1 selects all the header 1 tags, <h1>.
You can also select by tag #tag, where the html attributes tag="" will connect it to the rule.
You can also select the same way using .class and it behaves the same as tag.
But why are there multiple ways to select things for rules?
Because it applies rules in order from least specific to most.
A list going from least specific to most would look like
- Everything
* - A tag selector ex
h1 ClassId- Inline style
style=
Here are some examples of the different types of selectors in use.
h1 {

}

.box {

}

#unique {

}
Publishing your website
Our website is done! (for now).
You may have noticed by now that all the files you have changed have changed colors in the editor, and lines of code that changed also have colors next to them.
This is because of something called git , a code tracker that is used to help keep track of changes in versions of code. You can learn more about how git works here.
To push (update) the changes we made so that it becomes the new latest, click on the little source control window in the far left pane

Here you can see the files that have been changed. Enter a commit title, (Reflective of what you changed normally) and press commit. Press “Sync Changes”, so that the remote updates (github.com instead of just your local git)
You might get a message about where the action will push/pull from, you can just hit ok and ignore this.
Notice how all the lines in the editor that had changes and colors disappear? That's because this is now the new standard from where changes will be tracked.

Now, if we go back to the repository, we can click on the files and see the update code.
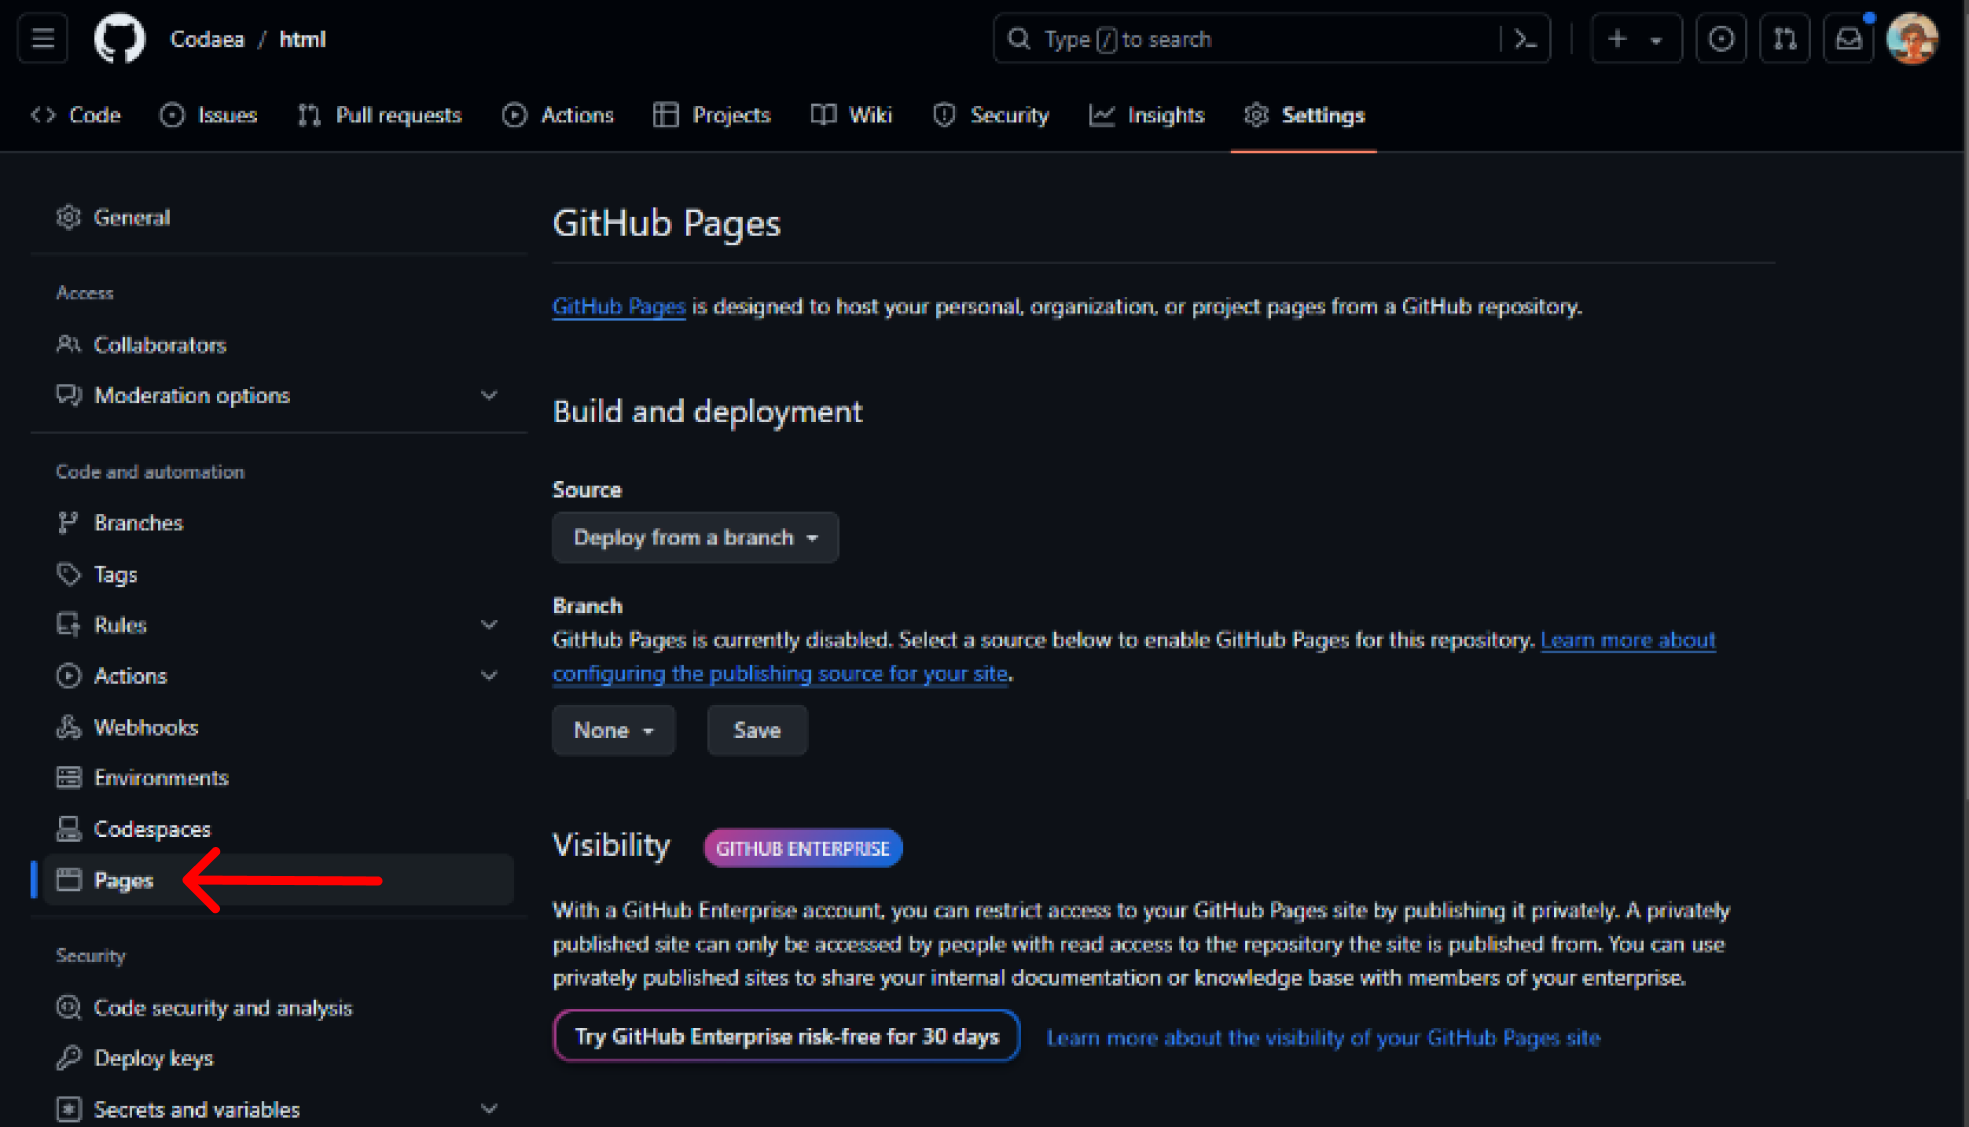
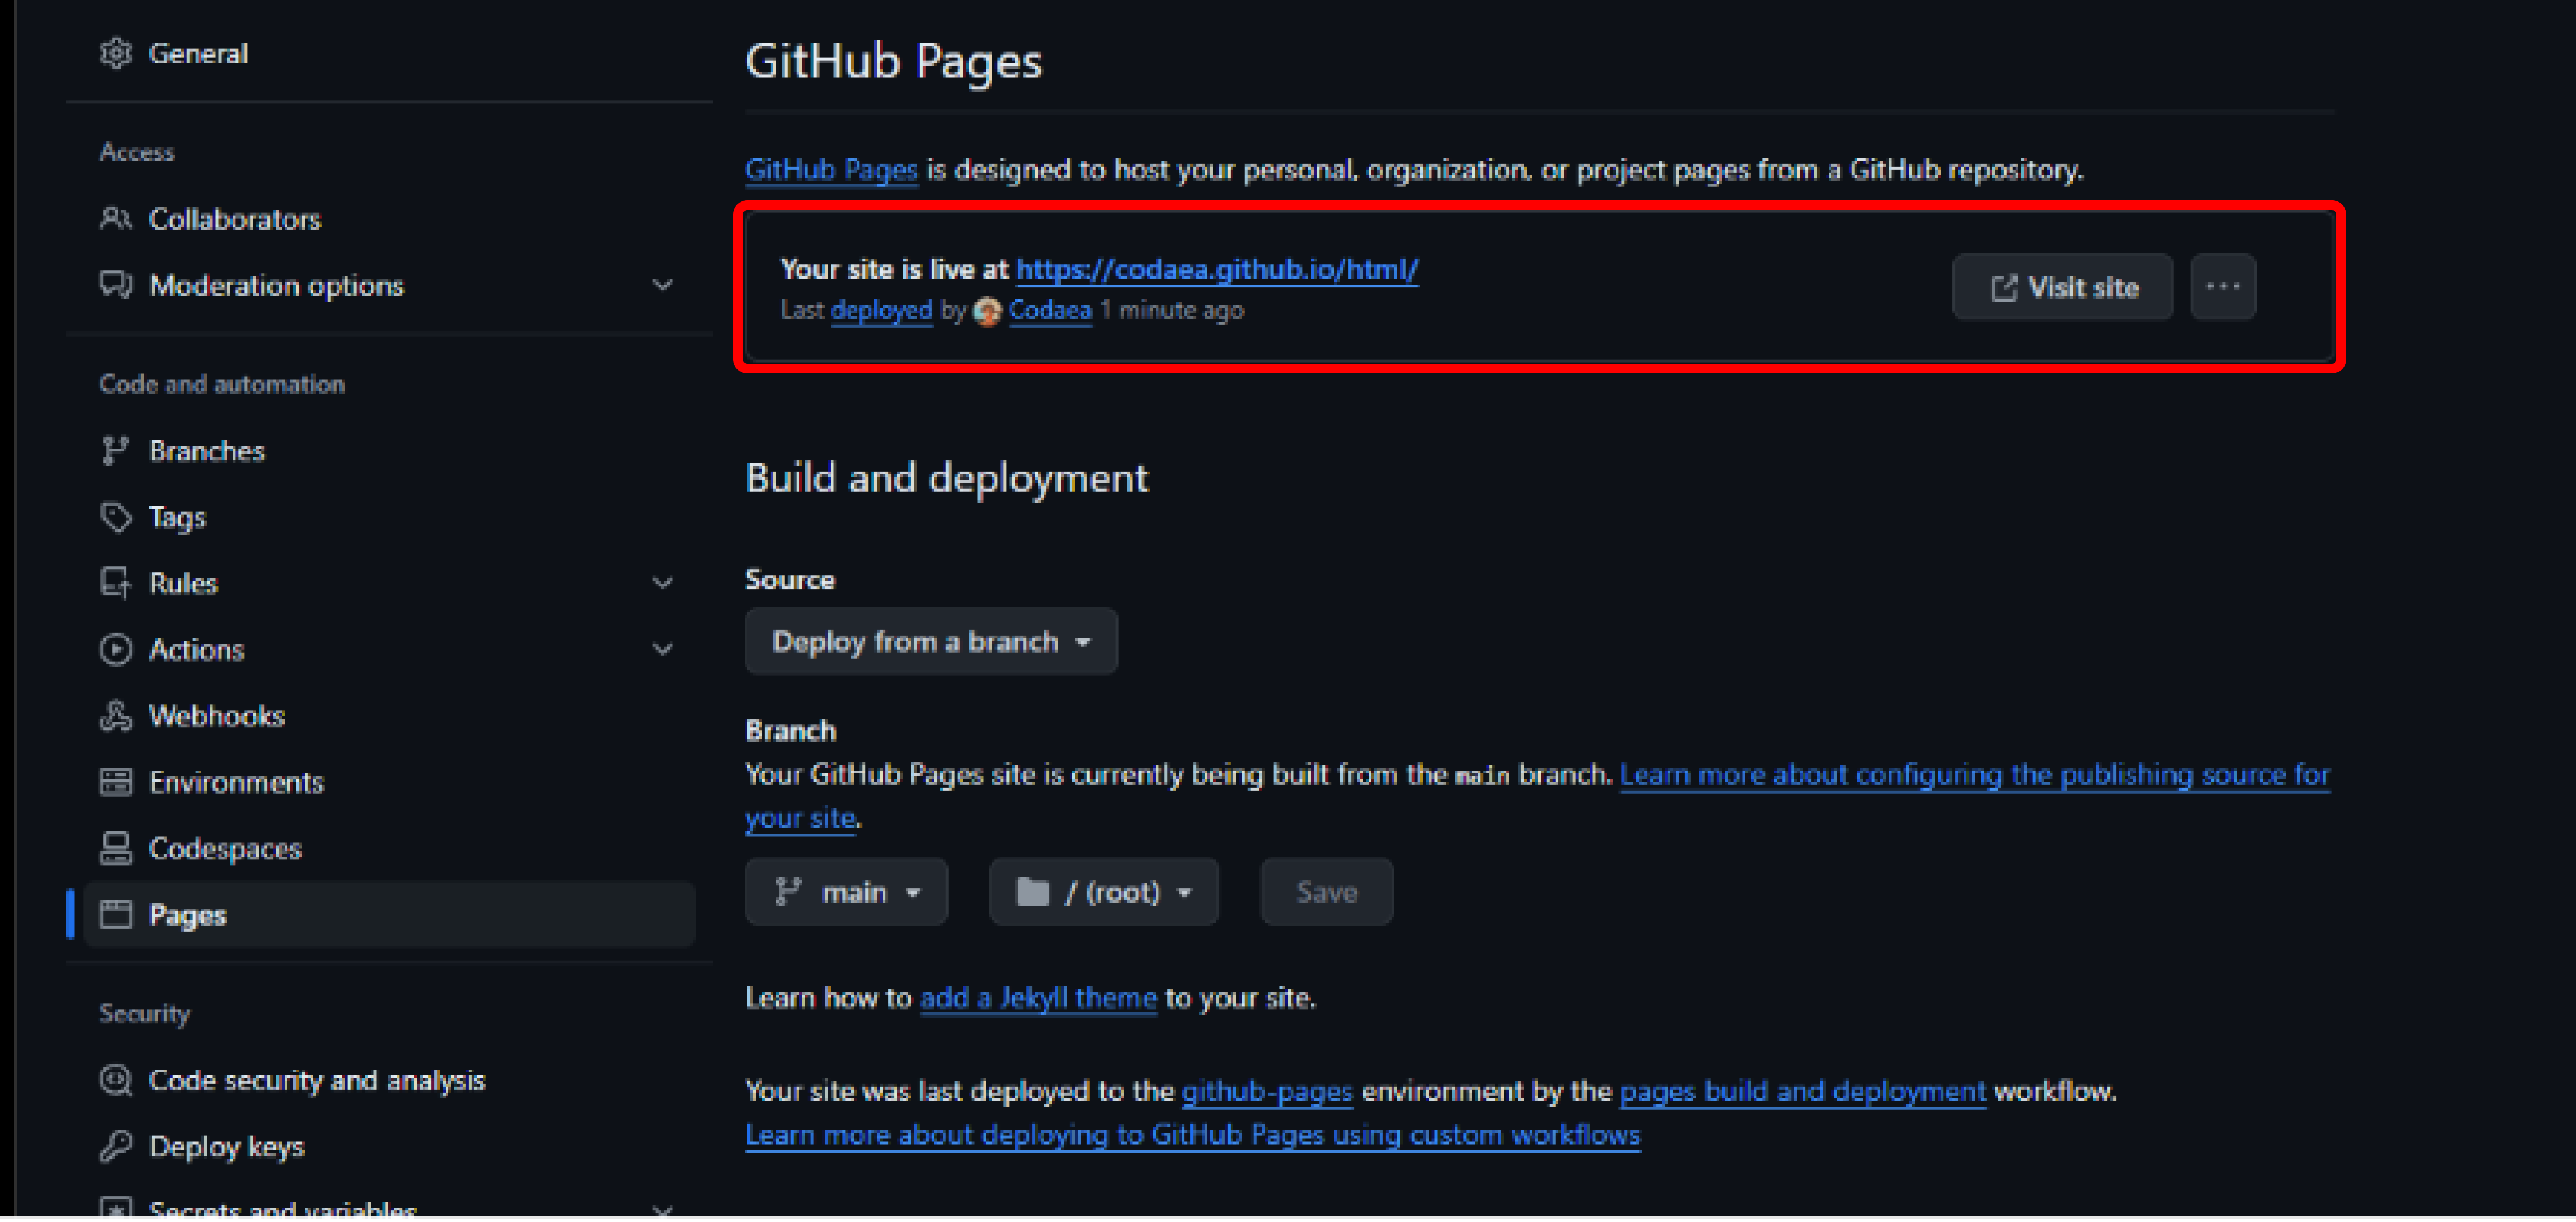
At the top, select "Settings", then Under "Code and automation", select "Pages"
Then, under build and deployment, change the Branch setting to "main" and click save
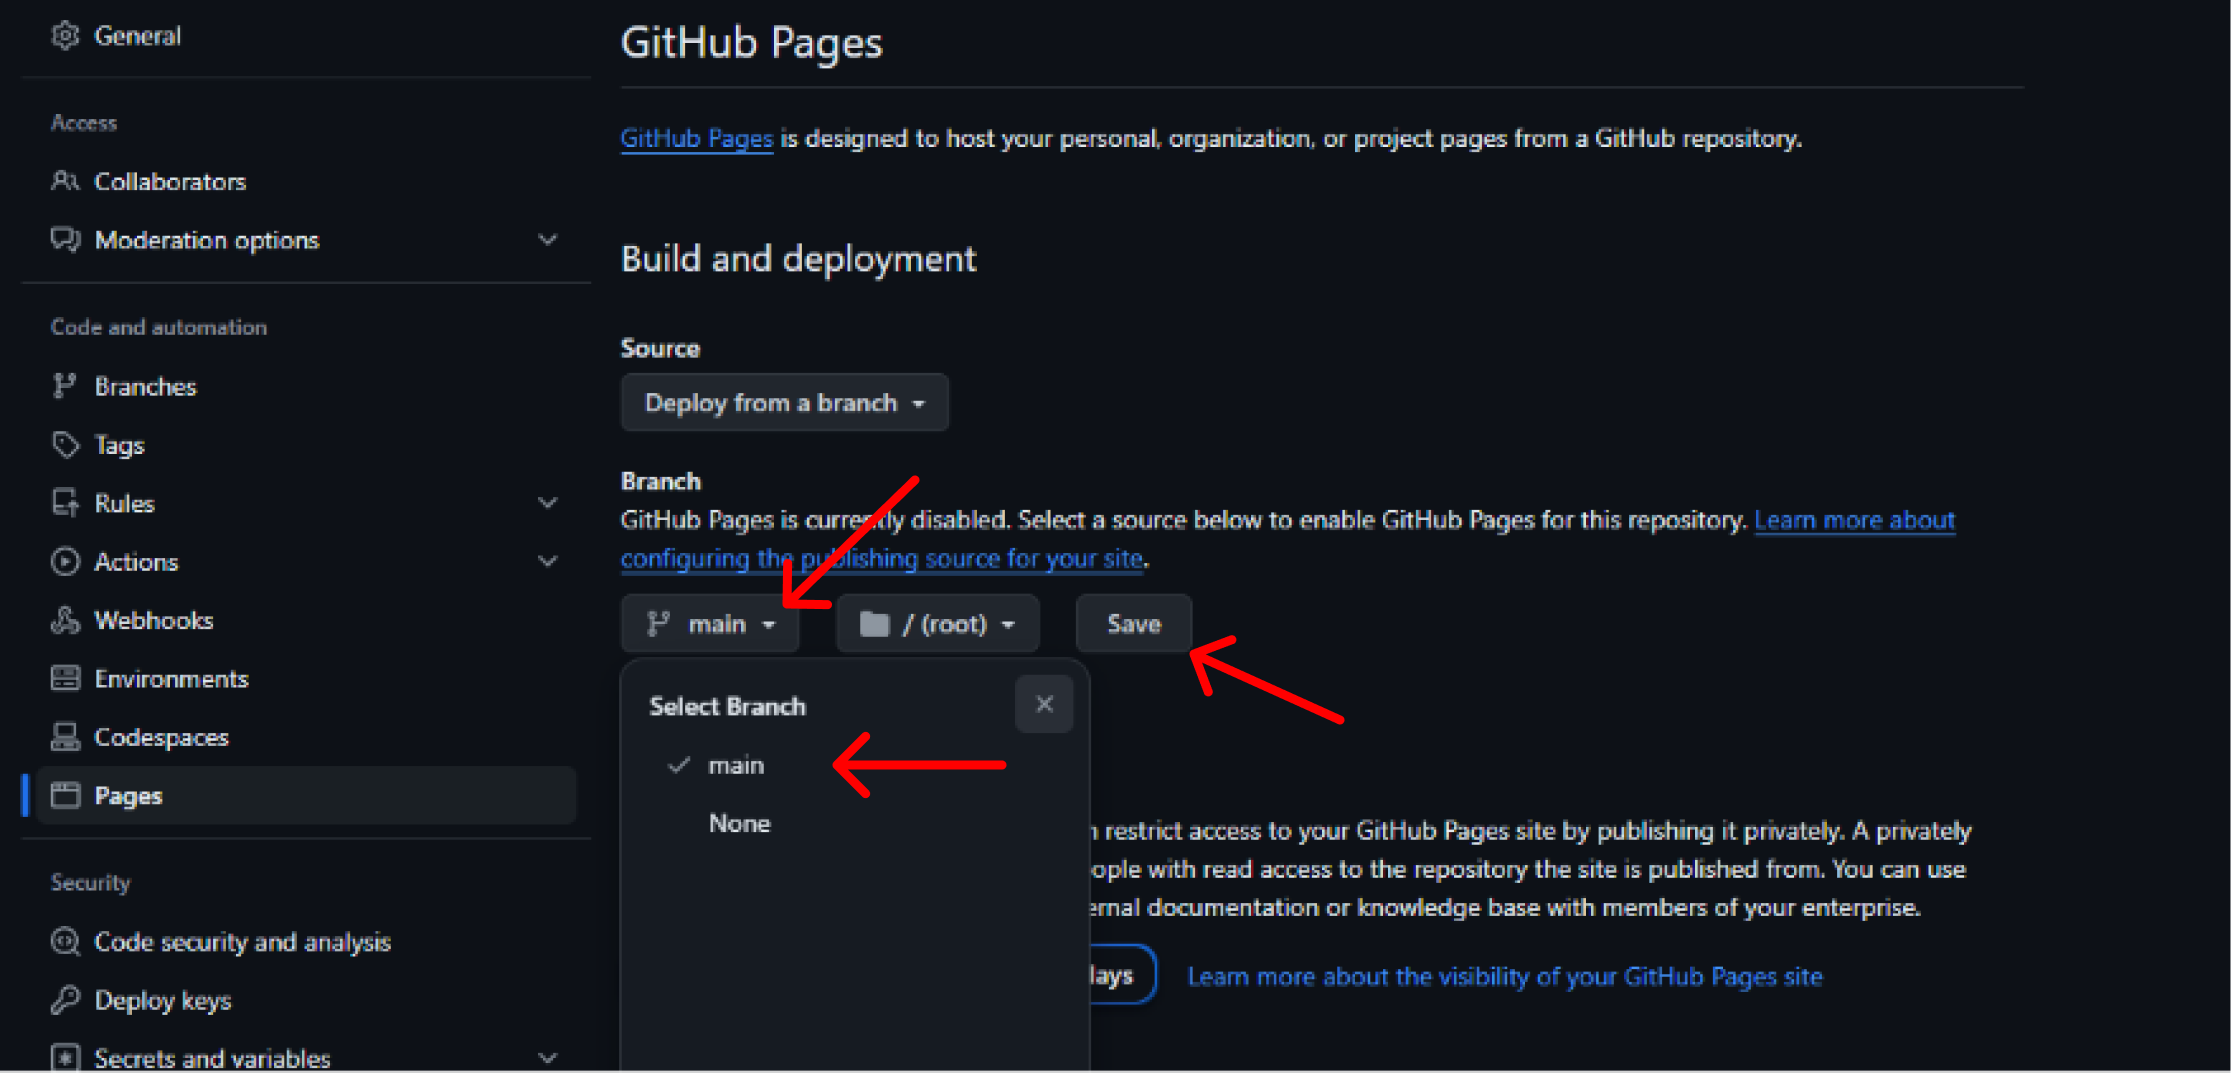
If you refresh, it should show you at the top where your site is live, and a visit site button.
Vocabulary
Repository (repo)- a location where code and project files are kept, using a version control system (VCS) like git.
Git - a version control software (VCS) that is used to help keep track of how code has changed through different versions.
IDE - IDE stands for Integrated Developer Environment,
HTML Tag -